Design a Radar System Icon :
If you wanna learn how to design a radar system in fully easy steps
well you came to the right neighborhood
as for designing : I recommend browsing these tutorials :
Here is the final Result : watch it and learn how to .
first here are the steps :
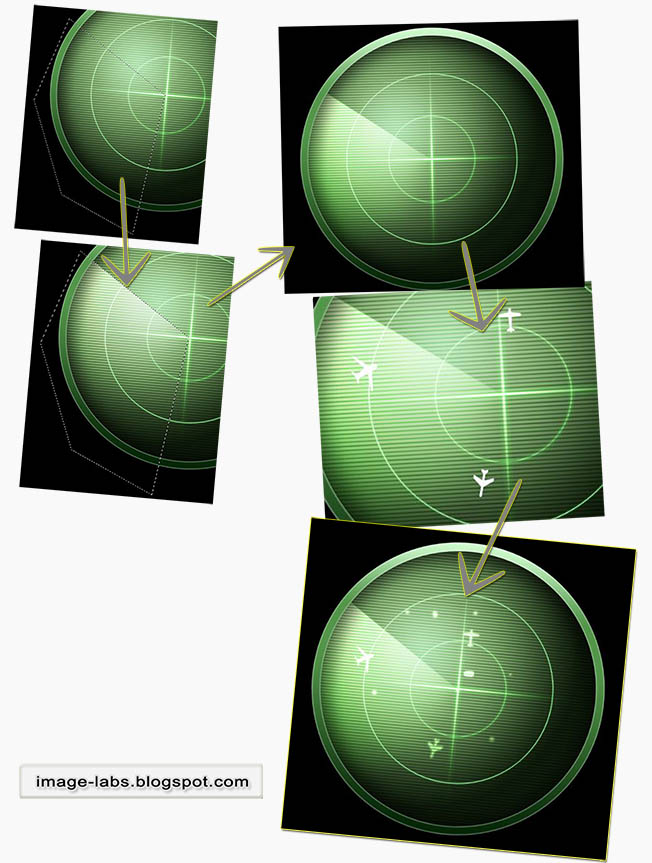
Step 1 : Designing the Outer Ring .
Step 2 : Designing the Inner Core .
Step 3 : Adding the Stripe Lines .
Step 4 : Adding circles , vertical and Horizontal lines .
Step 5 : Adding scanned Objects .
Just this so hear me out .
--------------------------------------------------------------------------------------------------------------------------
Step 1 : Designing the Outer Ring
First you are going to create new image and fill it with black .
then :
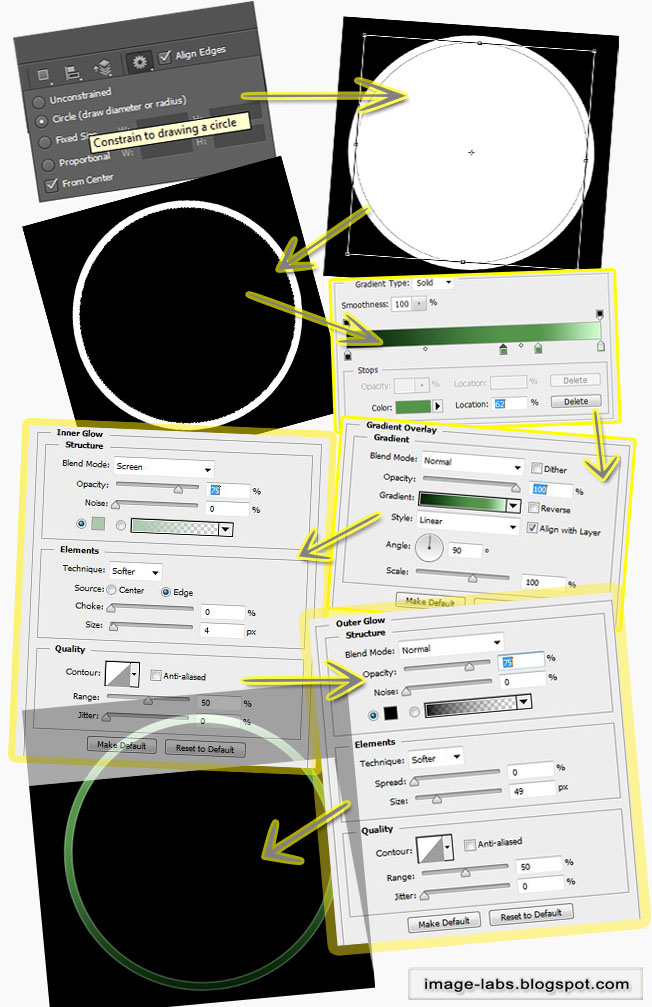
- create a circle with Elipse tool with these values : check on " from centre &
Circle " , fill it with white .
- duplicate it then decrease its size to let a space between the two circles represnting the thickness of the outer Ring .
- CTRL+Click on the small circle thumbnail to select it then select the bigger cricle and delete the selected area , that give us the ring we wanted .
- Now from Blending Options add a gradient like below starting from dark green to lighter green
- Add Inner Glow Option with light green :: mood to Normal , Opacity to 75 and Size to 4.
- Add Outer Glow Option With black color :: mood to Normal and Size to 50 .
The result will be as illustrated Below .
----------------------------------------------------------------------------------------------------------------------------
Step 2 : Designing the Inner Core
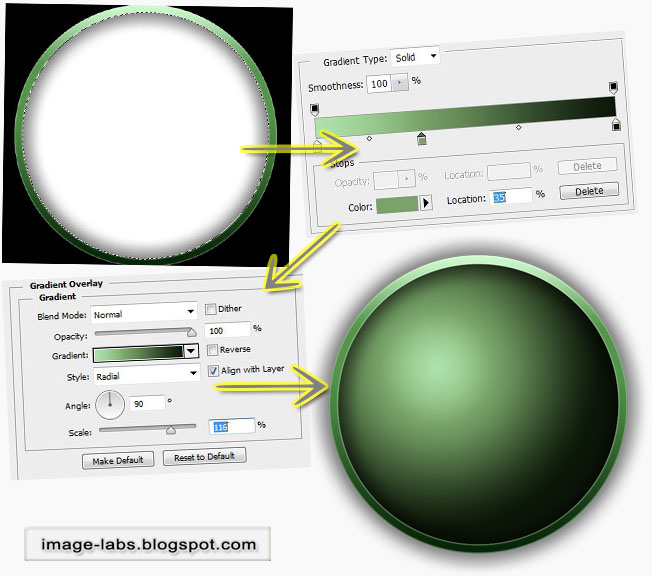
To design the inner core we need first to add new layer then :
- with magic wand tool select inside the ring then fill the new layer with white .# the shown shadow appears as we made it in the first step .
- from blending options add Gradient overlay with dark green to light green and with 90 degree .# with the mouse click on the core with holding drag it to place the gradient as you like .
- make sure the right side includes more dark green than the left side so as to make it appear in 3D mood .
As below :
----------------------------------------------------------------------------------------------------------------------------
Step 3 : Adding the Stripe Lines
Now I recommend that you focus for this step cause it is important
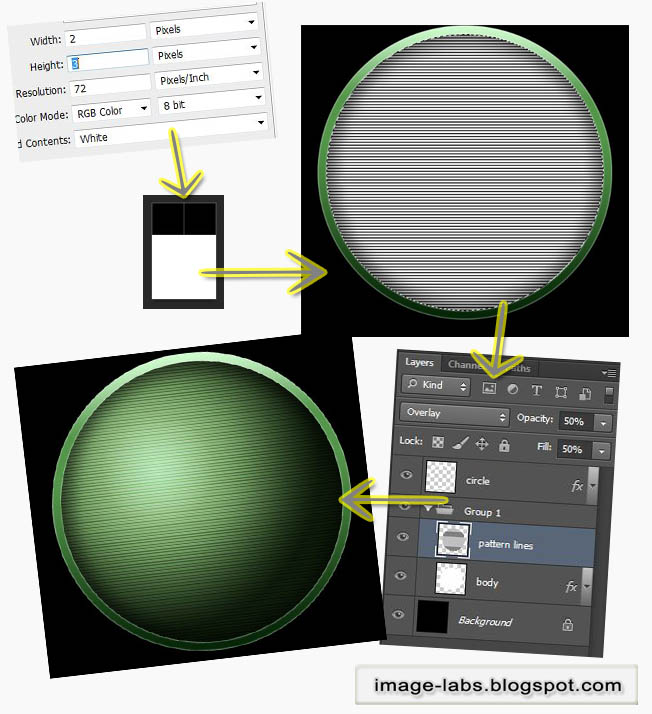
- make new Image by pressing CTRL+N with 2 px width and 3 px height or with 4 px width and 6 px height .
- with line tool make a black line on top of the image like below .
- from Edit choose Define Pattern and name it as you want .
- Now back to the original image and with selecting inside the ring as before choose the paint bucket tool and change its mood to Pattern , then choose the pattern we recently created .
- Inside the ring ,on the core click to create thses stripe lines as below then change its mood to Overlay .
As below :
---------------------------------------------------------------------------------------------------------------------------
Step 4 : Adding circles , vertical and Horizontal lines
Now we are almost done with the Radar System Icon
so we are going to create the vertical , Horizontal lines and the outer and inner circles
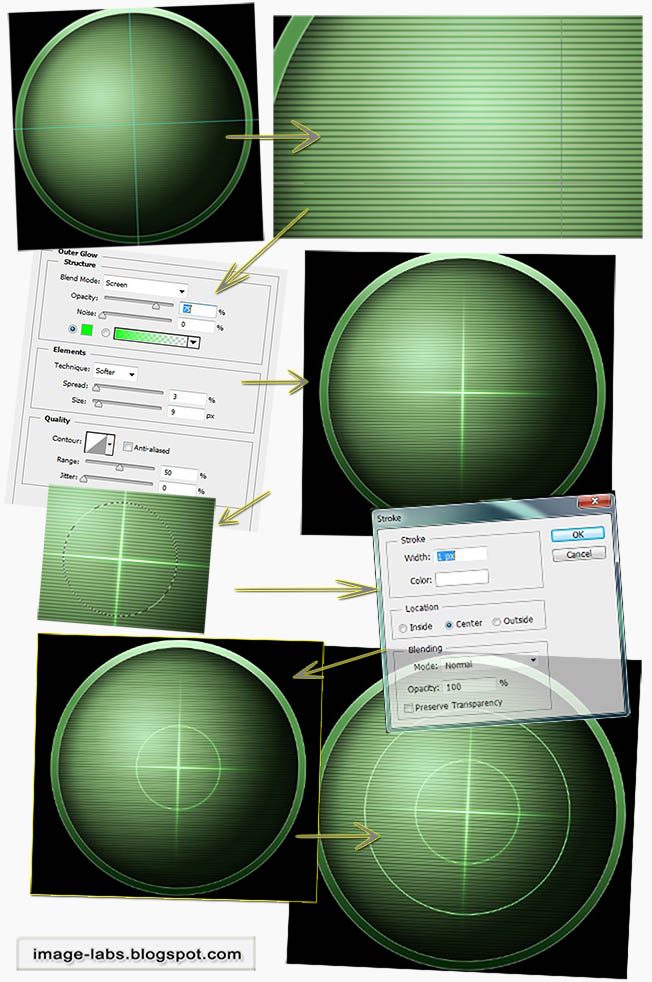
- CTRL+R to show the ruler then add vertical and horizontal guides right on the centre of the core . # you can CTRL+T on the core then add the guides to the middle points as a guide points
- using Pen tool add points from the start to the end of each line , no need to make it curvy just straight lines .
- then choose the brush and change the size to 1-5 px with zero hardness .
- choose back the Pen tool and Right click on the core and choose stroke ,choose from it the brush and check on stimulate pressure .
- as a result shown below , from blending options choose outer glow with : Spreed 3px , size 9 px .
Now for the circles :
- from eliptical marque tool make two cricles like below from the centre , and if you couldnt just select the core by CTRL+CLICK on its thumbnail and also choose the previous tool and right click on the core , choose Transform selection and resize the circle selection as you want .
- after you are done with the resizing , right click again and choose Stroke , set the values : width 1 px and the color to white or light green .
- it will create the same effect as the vertical and hrizontal lines , and if you are not satisfied with the result ! you can always add outer glow blending option .
the result is as illustrated below :
---------------------------------------------------------------------------------------------------------------------------
Step 5 : Adding scanned Objects
you can browse the internet for objects like planes or ships or any armory
well.. download them then :
- first make a selection as below to make the waving radar scanner
- with the gradient tool with white color make a gradient from the left top side and change the layer mood to Overlay .
- Now add the objects you downloaded as below ,resize it to fit the screen then change its mode to overlay , also you may add outer glow to add the glowing effect woth the light green color .
- add dots with brush tool also to the same layers .
and as illustrated below , we are done .
---------------------------------------------------------------------------------------------------------------------------
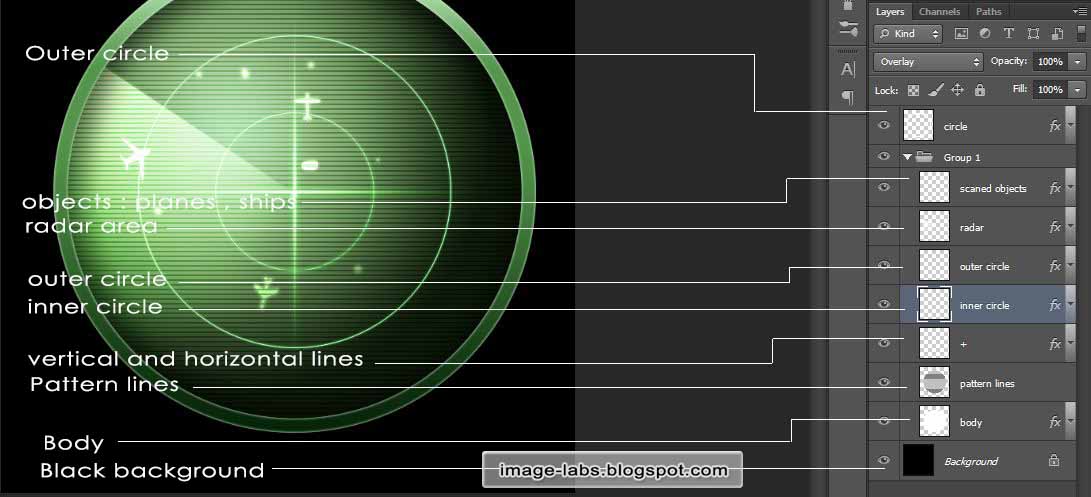
Here are the layers I have worked with
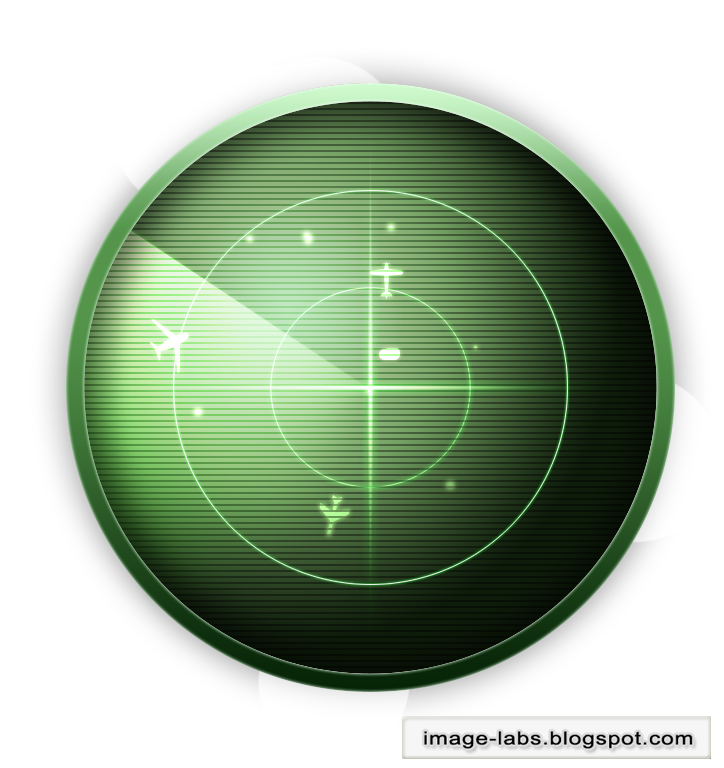
and here is the final result we seeked
I hope you like it .
And If you like it plz apreciate this by
subscribing by email : Here
or share it with below methods so everyone can benefit
also you may Join our website : Here
I hope I added something new to your DataBase
Thank You
Photoshop Tutorials
----------------------------------------------------------------------------------------------------------------------------------
----------------------------------------------------------------------------------------------------------------------------------


Great radar scope tutorial! I was looking for something like this, my attempts generated only ugly results and didn't look as a radar scope at all!
ReplyDeleteThank you, pal!
did you make it with this tutorial or you are still trying?
DeleteI can help you
This is great article, why don't you buy a domain for your website??
ReplyDeleteExcellent tutorial! All step are very clear and fresh. thanks for share this valuable tutorial.
ReplyDeleteClipping path service
Really impressive post. I liked your article and I hope you will have many entries or more. I enjoyed your article and planning to rewrite it on my own blog.
ReplyDeleteLooking for Best BBA college in ghaziabad, then there is only one college that can fulfill your all expectation. That is IPEM College.
MBA college in Delhi
Top MBA college in NCR
Top MBA college in Noida
Best MBA college in ghaziabad
PGDM college in ghaziabad
Top PGDM college in ghaziabad
Best PGDM college in ghaziabad
PGDM college in Noida
PGDM college in Delh NCR
MCA college in ghaziabad
MCA institute in Ghaziabad
Top MCA institute in Ghaziabad
Best mca college in ghaziabad
Best mca college in india
Top mca college in ghaziabad
Top 10 mca college in ghaziabad
Top mca college in delhi
Best BCA Colleges
BCA college in Noida
Best BCA Colleges ghaziabad
best bca colleges in India
top 10 bca college in ghaziabad
top BCA college in ghaziabad
best bca college in delhi
BCA college in NCR
top bca college in delhi ncr
Do you want an awesome, astonishing and stunning book cover for only 5$? It's available exclusively on Fiverr!
ReplyDeleteGo check it out!!
www.fiverr(dot)com/shayonkhaled/professional-unique-ebook-cover
Replace the dot with a fullstop (.)
Thank you for your valuable time! :)