Hey guys
This is a new tutorial for how to make colorful mosaic text generally " color typography " .
well you need a bunch of photos
it doesnt require big resolution just a high quality .
so as always here is the final result

----------------------------------------------------------------------------------------------------------------------------------
Step 1 :
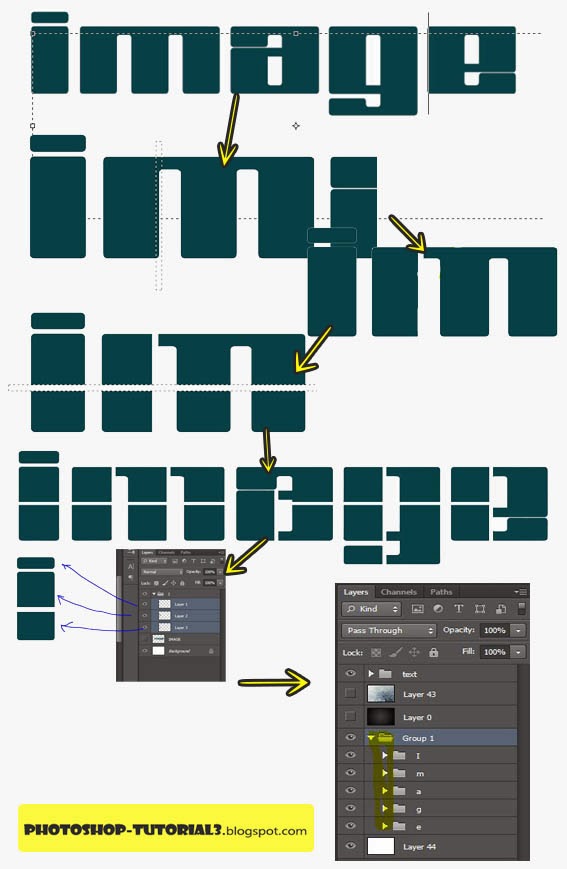
then write the word you want
well , Im going to put a lot of Pics over these letters , you can place one picture for each letter
but the best thing is to place more than two pics over each letters .
so I used a random font like above but you can download a better font called Quasoid Font
that you can download it from here .
but I used the other font so I had to divide its part
so I made a selection which its width fits the divided space like below :
so you can place it where ever you want and delete but before that you will have to rasterize the text .
then make a horizontal dividing
I like it better than the other font .
----------------------------------------------------------------------------------------------------------------------------------
Step 2 :
Now we need to put one photo on one part ..how??!!
well we need to make each part on the text in one layer so as to make it easy to put the photo on it
as Im going to make a procedure that will place the photo over the letter part where it cant exceed its borders .
first make each part in 1 layer
so make a group labeled as the letter name like " group I "
then with " magic wand tool " select each part on that letter then right click , choose " layer via cut " .
then place it in the letter group .
like below :
lets assume we divided the letter I , then these parts will be placed in each layer in the " I group " .
well . here are the result as before , you will find the five groups each group contains its letter parts .
----------------------------------------------------------------------------------------------------------------------------------
Step 3 :
Now we came to the important step " placing the pics " ,, how ??!
first open the photo in PS
then move it to the main text PS
then resize it to look small enough to fit the letter part you will place it over .
like this
now its over the small part of the i letter " over the i dot " .
now focus on this :
- make the letter part underneath the pic
- select the pic layer
- hold ALT and hover over the line separating the two layers
- click on it .
Note : you will see as soon as you place the mouse over that line the cursor change to another symbol
that when you click , you will notice the pic layer mover a little to the right and the pic became within the borders of the letter part like below
Now continue doing this for all the parts with more photos
it wont take long but its somehow boring so I had to watch FRIENDS along working .
Now we are done with Text picture placing " the main Step " .

----------------------------------------------------------------------------------------------------------------------------------
Step 4 : " Finalizing " .
well now we need to place a background behinf the text
Grab a texture background any where from the web
I used this as a background .
you van end up with this result with making a drop shadow or any blend option you like
but here I chosed to add a 3D effect , making exactly a 3D not effect
you can review it here in this tutorial : " Photoshop Tutorial : How to make 3D Effect " .
but to make it clear :
open action window then make a new action , it will start recording immediatly then :
- duplicate the text layer .
- place it underneath th text layer.
- CTRL+T then make its hight to 99.5 % but check the left icon to restrain its dimensions
Stop recording then play the action several times to generate layers smaller the the previous
so that make the 3D effect .
for more information get back to the " Photoshop Tutorial : How to make 3D Effect " .
the result will be as follow
before you add shadow or anything :
grab the whole layers except the original one then merge them
duplicate it
after that CTRL+Click on the layer’s thumbnail to select it
then with a dark color click Edit >> fill >> ok
then change its blend mode to Overlay or Color Dodge .
the 3D borders will be darker and more realistic like below :
Now you have three layers " - original layer
- duplicated over lay layer
- the 3D layer
make a drop shadow and outer glow to each layer from the 3 layers ,with suitable values .
--------------------------------
Then you may add stars like below it will enhance the effect and make it shiny .
you can download the Stars Brushs from here
Here you can see for more details that photo below
how the 3D effect looks like , and how the photo replacement will be effective
how the 3D effect looks like , and how the photo replacement will be effective
And here is the final result

---------------------------------------------------------------------------------------------------------------------------------
If you like plz apreciate this by
subscribing by email : Here
or Join our website : Here
I hope I added something new to your DataBase
Thank You
-----------------------------------------------------------------------------------------------------------------------------


Really Awesome work :) You have done such an amazing job on this series. I envy your sewing skills and your patience and your diligence. If anyone ever asks me how to sew, I'm sending them to your blog and this series. Congratulations on such an extensive, well thought out and clearly presented set of this Photoshop tutorial.
ReplyDeleteRegards,
Edd.
Designer@ Background Removal Service/Clipping Path/Clipping Path Service/Neck Joint Service/Image Masking Service/Color Correction Service/Background Removing Service/Photo Retouching Services/Background Remover
Do you want an awesome, astonishing and stunning book cover for only 5$? It's available exclusively on Fiverr!
ReplyDeleteGo check it out!!
www.fiverr(dot)com/shayonkhaled/professional-unique-ebook-cover
Replace the dot with a fullstop (.)
Thank you for your valuable time! :)