Design an Ipad from scratch :
I showed in my previous Tutorial How to design Phones like Samsung and Nokia and I showed that designing a nokia is harder but if you did ! you would be able to design anything related to technology .
So : here are the two tutorials that I heavly recommend to check it first
At first here is the final result for Designing the IPad .
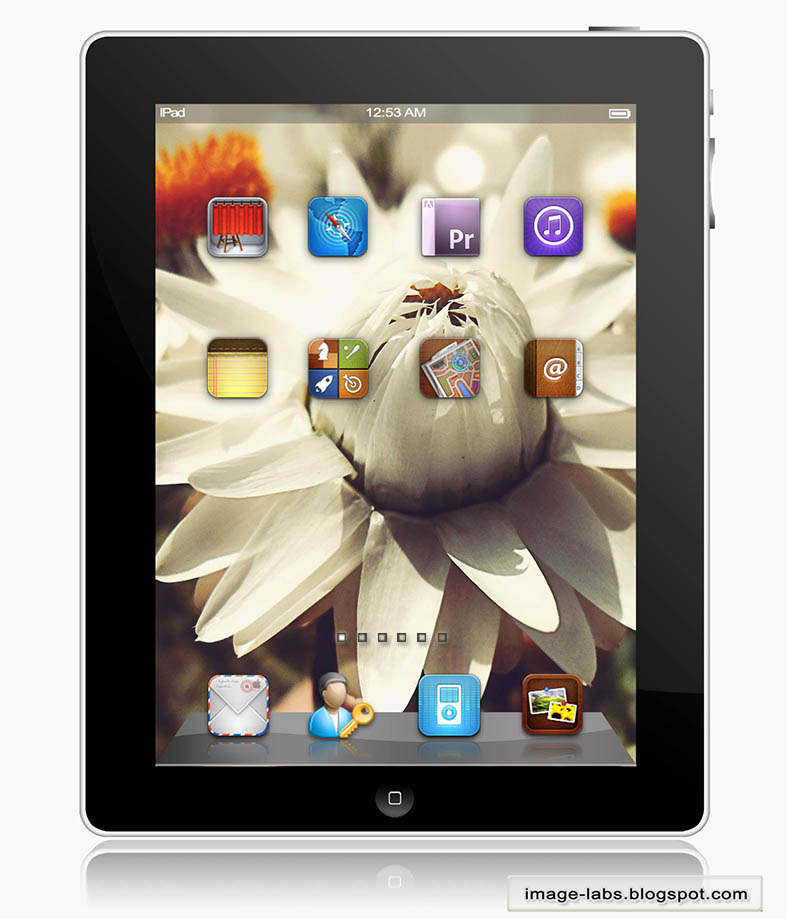
Here are The Steps Headlines :
Step 1 : Creating the IPad Body .
Step 2 : Adding Buttons and Screen .
Step 3 : Creating the IPad Dock and Texts .
Step 4 : Adding the IPad Icons .
Step 5 : Creating a 3D Reflection for the IPad .
------------------------------------------------------------------------------------------------------------------------------------------------
Step 1 : Creating the IPad Body .
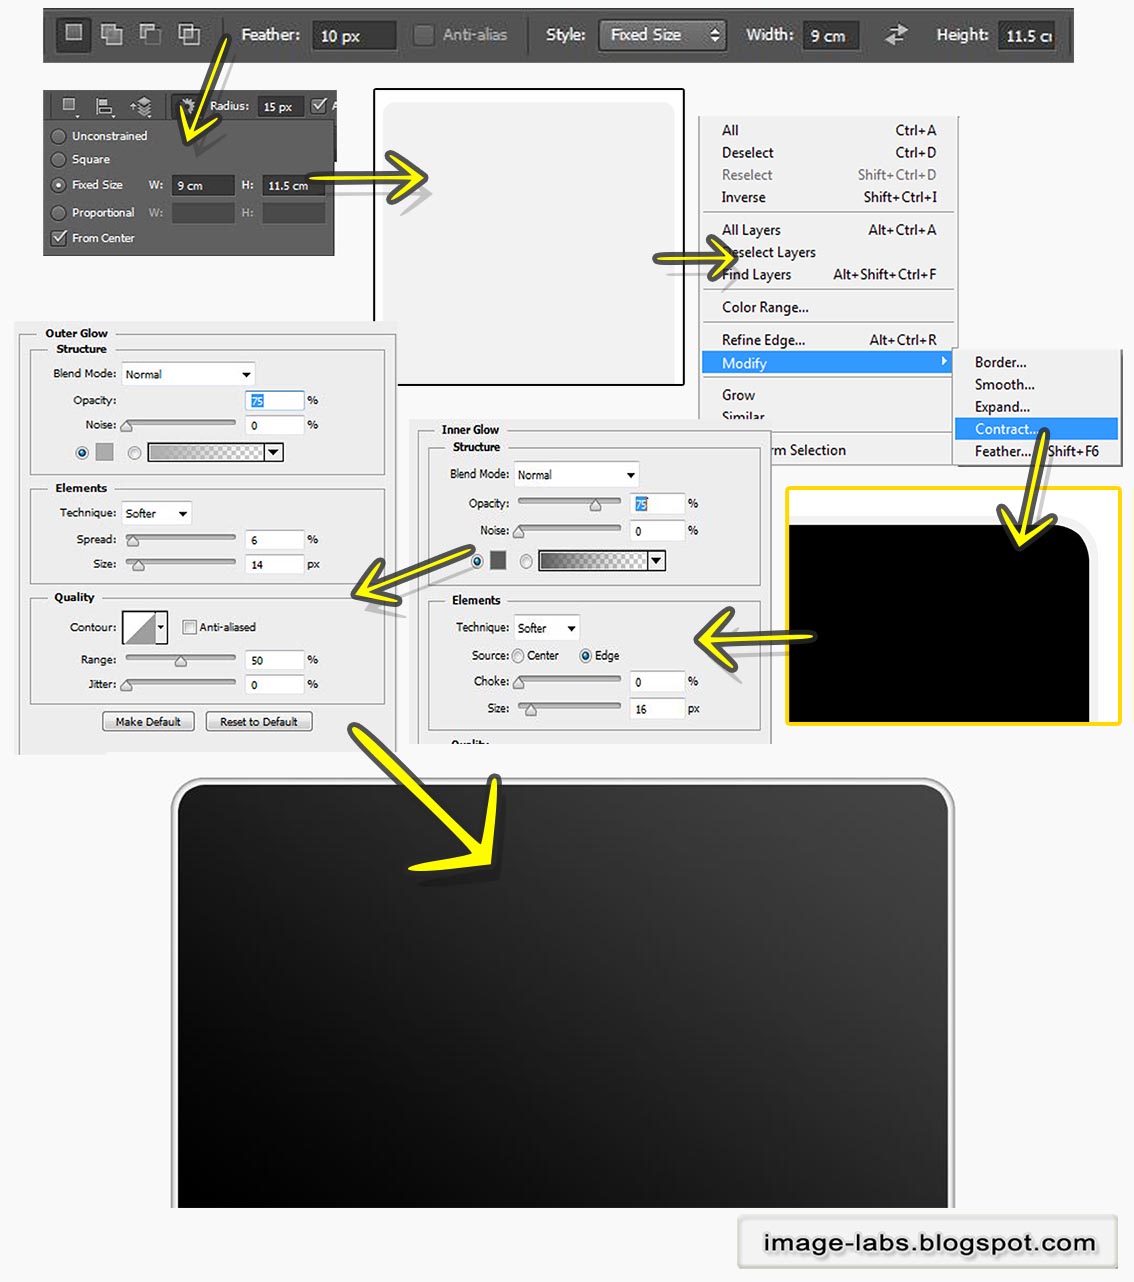
Create a new Image and choose light gray color then you can choose either rectangular selection or rectangular shape tool but I will go with the rectangular shape tool ...
- first choose the rectangular shape tool and adjust its options to : Radius 15 px , Fixed Size : 9 cm width - 11.5 cm height .
- draw the rectangular we created with the given color, you may increase its size keeping
the fixed ratio as it is ,for me I made it to about 400 cm in width to make it very clear to
work with .
- select the shape after rasterizing it and from Edit >> Modify >> Contract >> 15 Px to
create the outer thickness by reducing the selection size .
- fill the new selection layer with black and apply outer glow for the black layer and inner glow for the gray layer
Inner Glow : size 16 - color dark gray
Outer Glow : size 14 - color less dark gray .
-------------------------------------------------------------------------------------------------------------------------------------------------------
Step 2 : Adding Buttons and Screen .
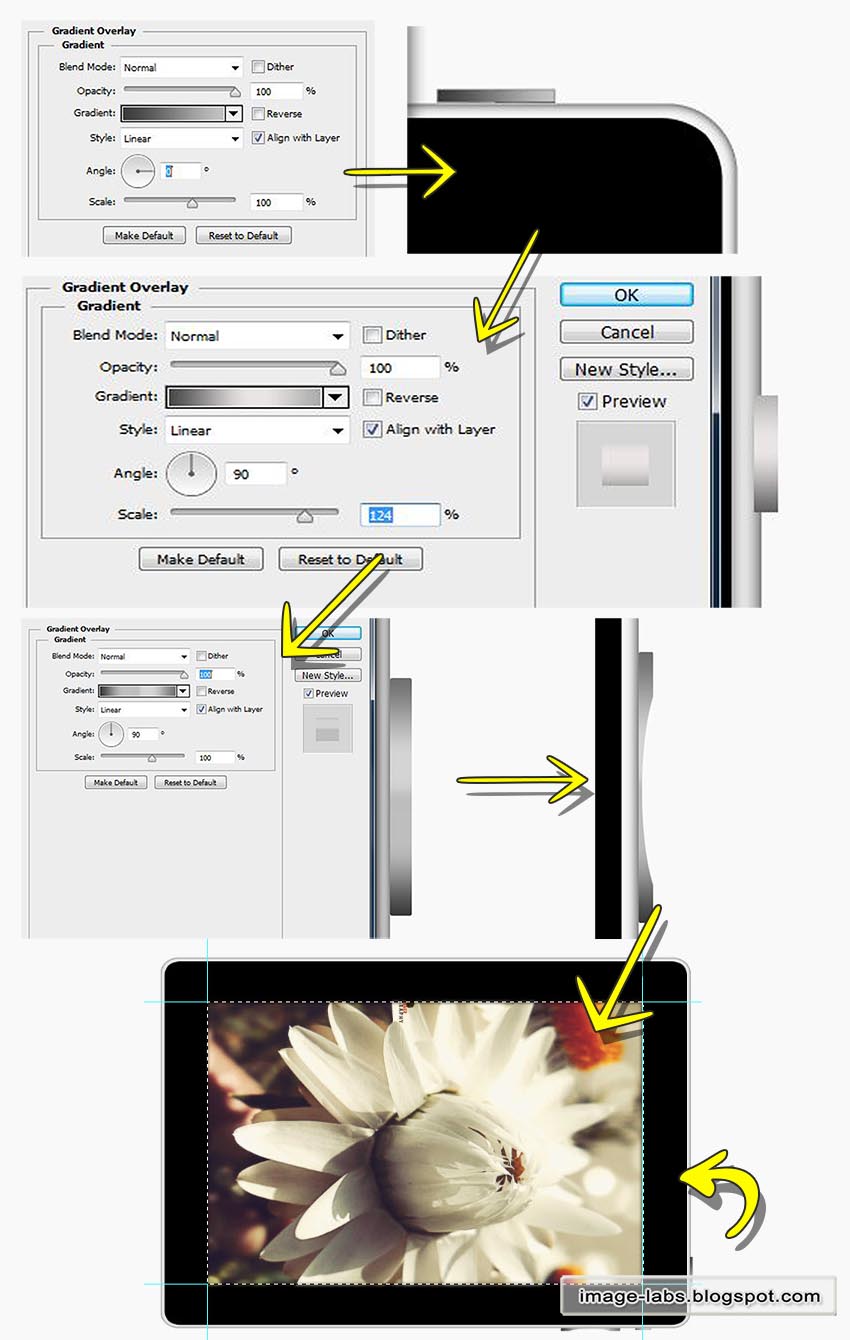
Now add rectangles with gray colors .
- first create a wide small rectangle on top of the IPad then apply a Gradient overlay
from blending Options with dark gray to gray colors .Angle : 0 .
- create a rectangle but this time vertical one and add the same gradient overlay with
angle : 90 .
- add a very wide vertical rectangle under the previous one with multiple gray values like below and Angle : 90
- from ellipse marquee tool create a small wide selection over that rectangle and
delete inside it as below .
- CTRL+R and add vertical and horizontal guides to Define the borders for the
screen ,say like 100 px as margins
- Pick the background photo you like and add it to the border area like below .
---------------------------------------------------------------------------------------------------------------------------------------------------
Step 3 : Creating the IPad Dock and Texts .
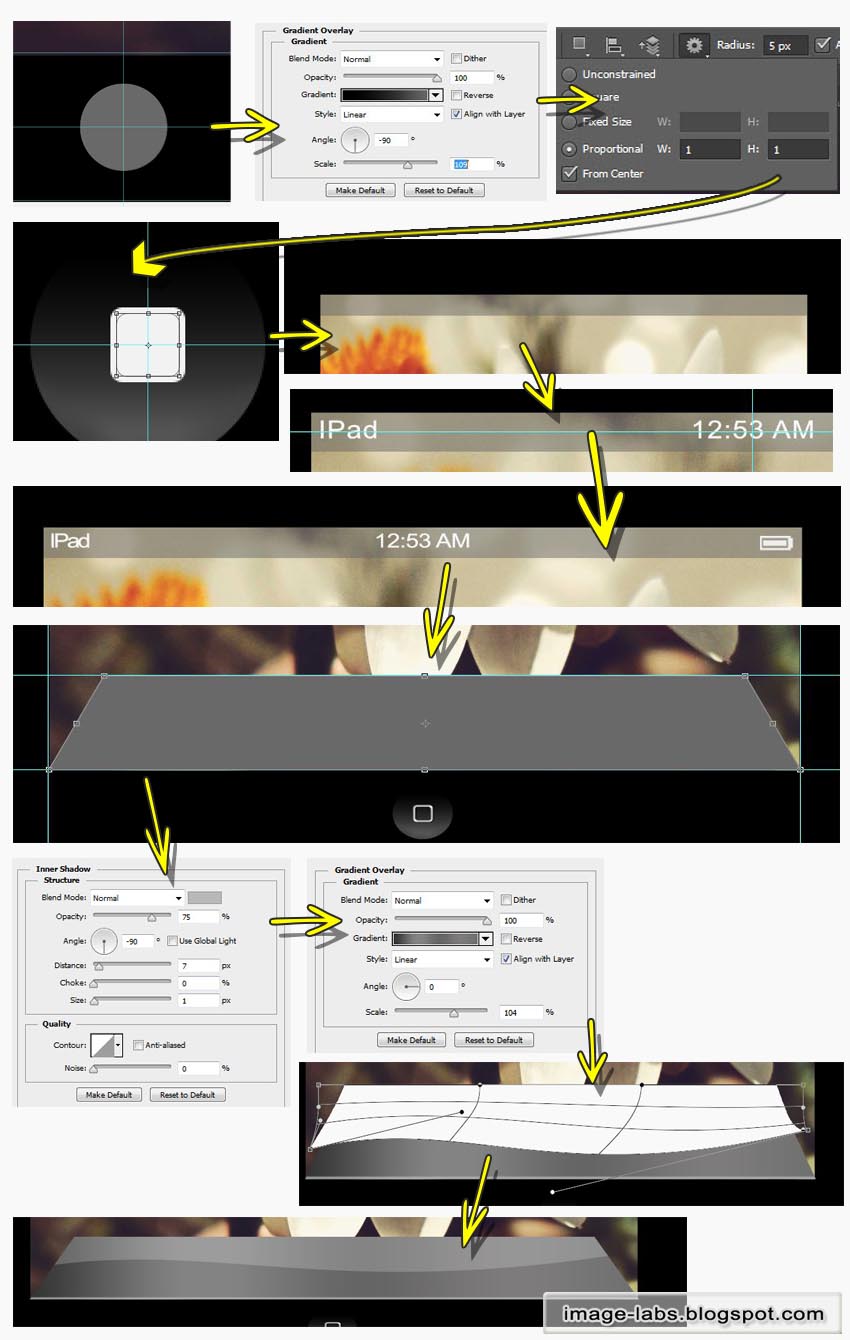
For the main Ipad Button just do as below :
- create a small circle shape with light gray and add a gradient overlay with dark gray
color with -90 as Angle .
- then create a small rectangle with white color inside the circle then duplicate it
and reduce its size , select it and delete over the bigger rectangle to create a
thickness .
- Now for the upper rectangle representing the hour and battery charge ,create a wide
rectangle as below with gray color then drop its opacity to 50 % .
- Then add the texts shown and you can create the battery with shapes .
- for the dock create a rectangle with dark gray and CTRL+T , right click and choose
prespective and transform it as below .
- then add the below gradients with dark gray to light gray .
- create a new layer and with pen tool add a selection like below to make a wavy
line ,then fill it with white and drop its opacity to 50 % .
As below :
-----------------------------------------------------------------------------------------------------------------------------------------------------
Step 4 : Adding the IPad Icons .
First you can download the Icons from Here
Adding it is very easy and doesnt require any skill .
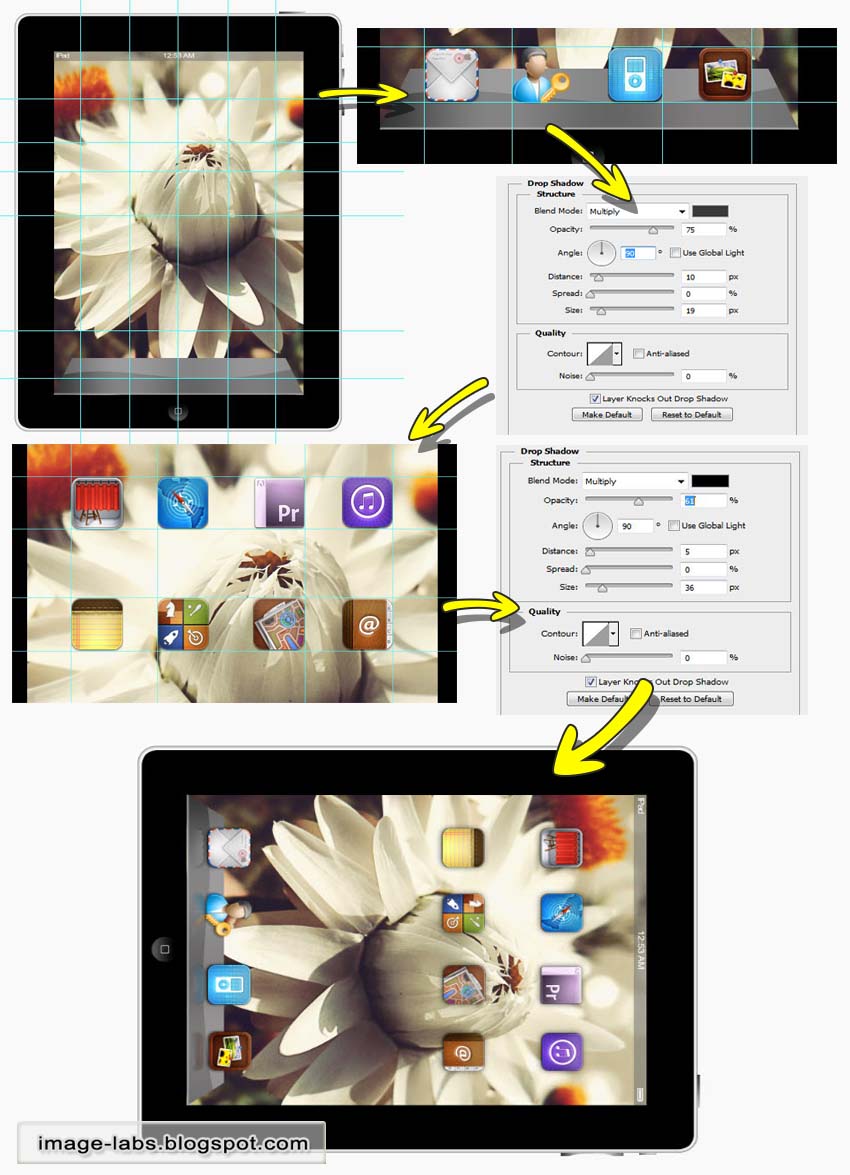
- first create vertical and horizontal guides to represent the positions of the
Icons . # like below.
- add four Icons on the dock and duplicate them then place them under the 4 icons
and drop the opacity to 20 % to create their reflection , then add drop shadow like
below .
- again on the screen add 8 Icons in their positions then add a drop shadow as below .
-----------------------------------------------------------------------------------------------------------------------------------------------------
Step 5 : Creating a 3D Reflection for the IPad .
Now to add an advanced reflection for the Ipad ....that will make your design fascinating .
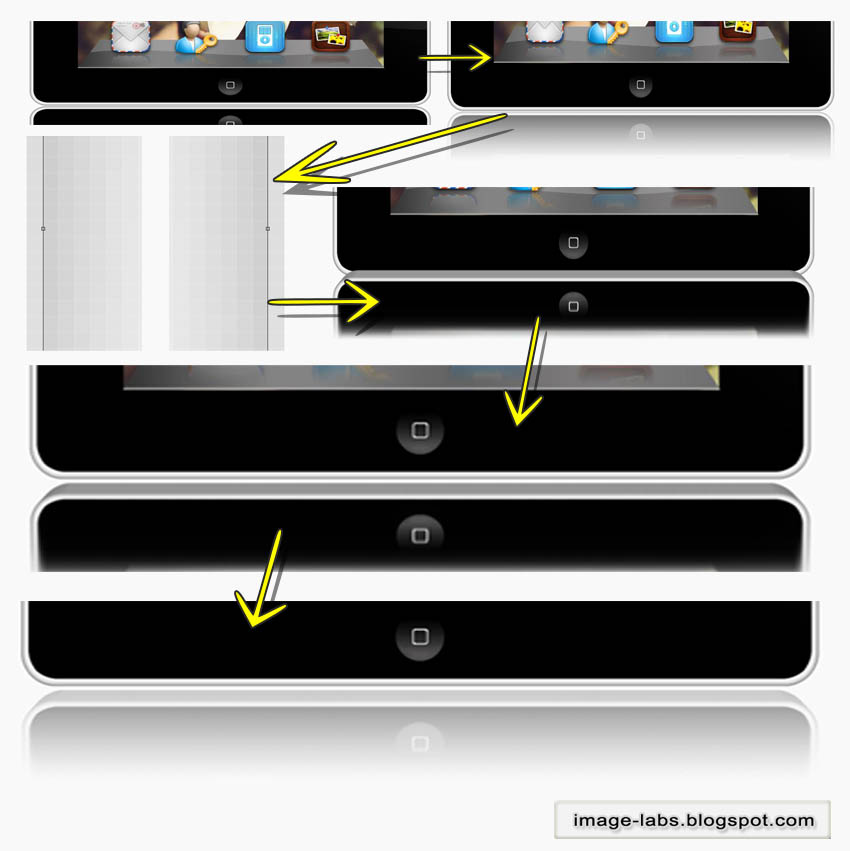
- group the whole layers except the background then duplicate that group , then
right click on it and choose merge group .
- CTRL+T , right click and choose Flip vertical then place the layer underneath the
original IPad .
Now if you remember How to Apply a 3D Effect do the following :
- for the reflection layer : create new action then duplicate the layer and place it
under the reflection layer .
- CTRL+T and zoom to the photo and move the layer 1 px to the top and shrink the
width 1 px to from the right and 1 px from the left ,then press enter .
- Stop recording the action and press play several times , you will notice a 3D
thickness being created as long as you keep pressing play .
- merge all the 3D layers and erase over the reflected layer as below .
As below :
And here is the IPad you just created ..
I hope you like it .

-------------------------------------------------------------------------------------------------------------------------------------------------
And If you like it plz appreciate this by
subscribing by email
: Here
or share it with below
methods so everyone can benefit
also you may Join
our website : Here
I hope I added something new to your DataBase
Thank You
Photoshop Tutorials
----------------------------------------------------------------------------------------------------------------------------------
----------------------------------------------------------------------------------------------------------------------------------


thank u man all ur tutorials were helpful and this one is an exceptional
ReplyDeleteWonderful tutorial. all steps are very clear and valuable.
ReplyDeleteclipping path service clipping path NYC clipping path background removal service Ghost Mannequin Service
Do you want an awesome, astonishing and stunning book cover for only 5$? It's available exclusively on Fiverr!
ReplyDeleteGo check it out!!
www.fiverr(dot)com/shayonkhaled/professional-unique-ebook-cover
Replace the dot with a fullstop (.)
Thank you for your valuable time! :)