Making a displacement map to your photos is one of the most icredible Techs you could apply on
PHOTOSHOP
so This is the final answer and it could be different as you would see in the end of the Post

It is good beleive me
So lets Start :
------------------------------------------------------------------------------------------------------------
Step 1 :
Open your photo

And your Country Flag

together in one file But be sure that the flag layer is above the the photo

Hide the Flag Layer then work with your photo
first of all
you are going to desaturate your photo colors if its colored
from Image >> Adjustments >> Desaturate
After that we are going to make the white color whiter and also the black
color
so from Image >>> Adjustment >>> Levels
like that
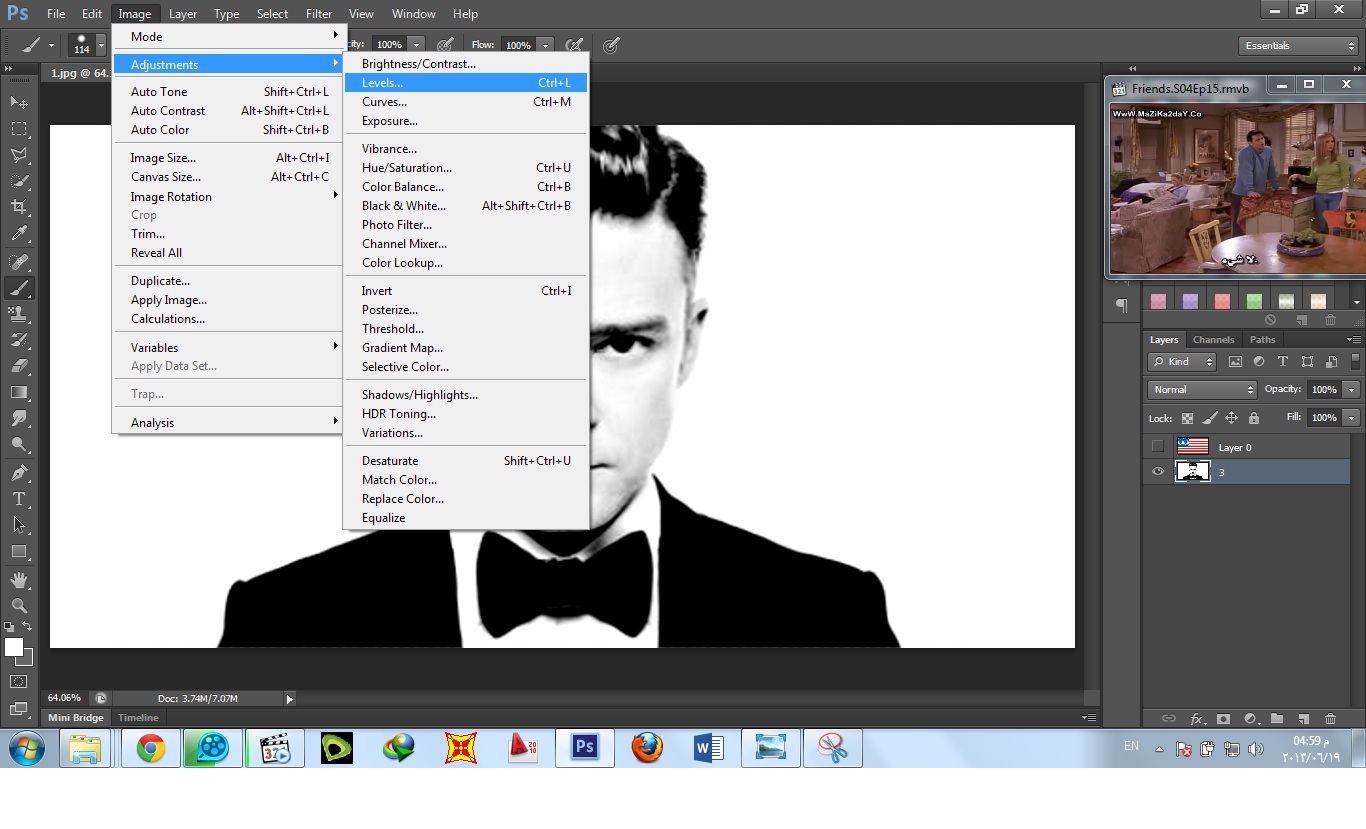
and then pull the arrow in the right to left and the same to the left arrow
that will make colors more tense

After that duplicate that layer and from Filter >>> Blur >>> Gaissian Blur
like that

Then OK and save that as MAP.PSD
Then delete that blured photo
Or you might not duplicate it and blur it directly and after saving it you could
CTRL+ALT+Z
to recover the original desaturated photo

It will Be like that

------------------------------------------------------------------------------------------------------------
Step 2 :
Now show the Flag Photo and do the following

From Filter >>> Distort >>> Displace
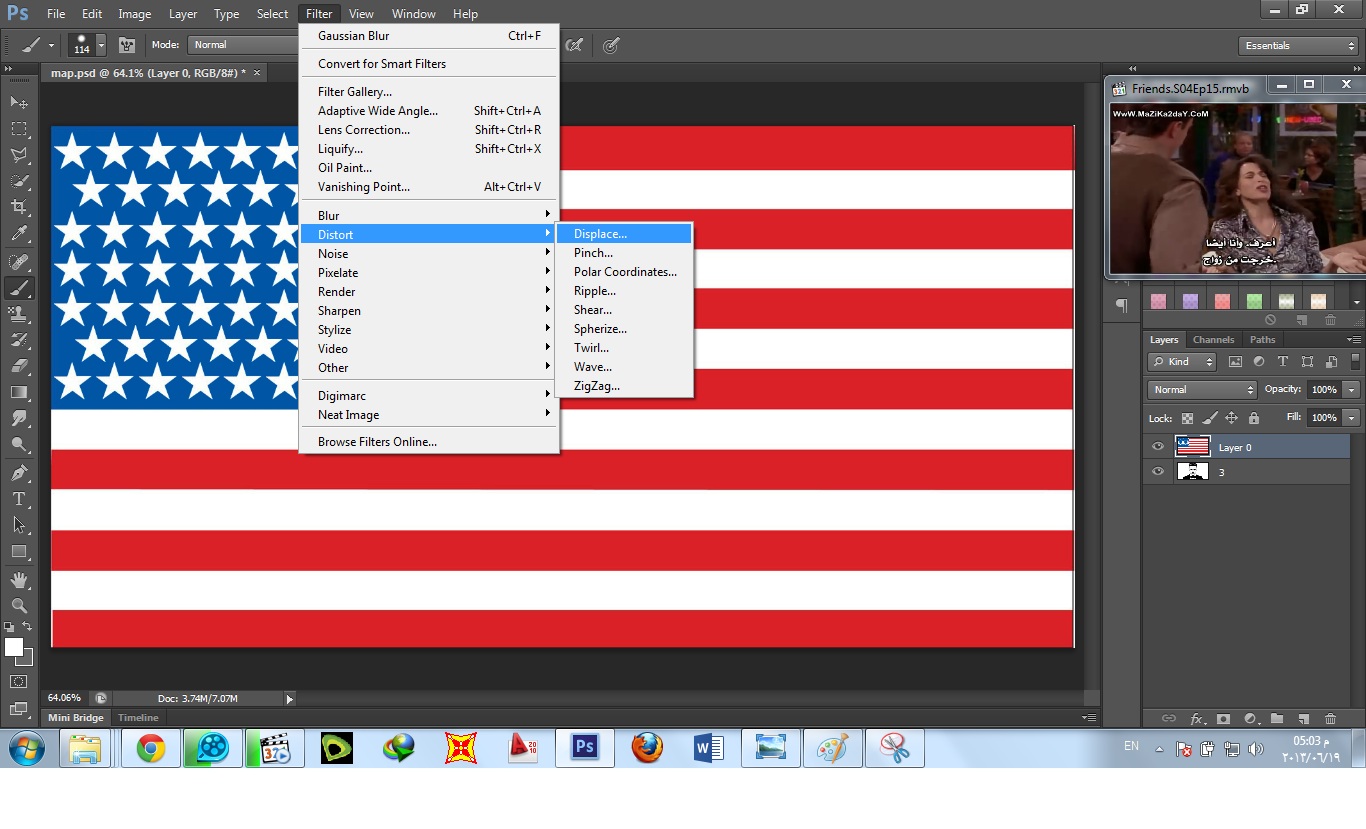
It will Show a menu you can play with the Numbers But it really doesnt matter
Press OK , then it will show a Window where you can open the Map File that you
just
saved from .
Select it and Press Open

The Result Will be like that

I dont know , Maybe you just leave it like that
Or you could change the flag layer Blend Mode into Darken
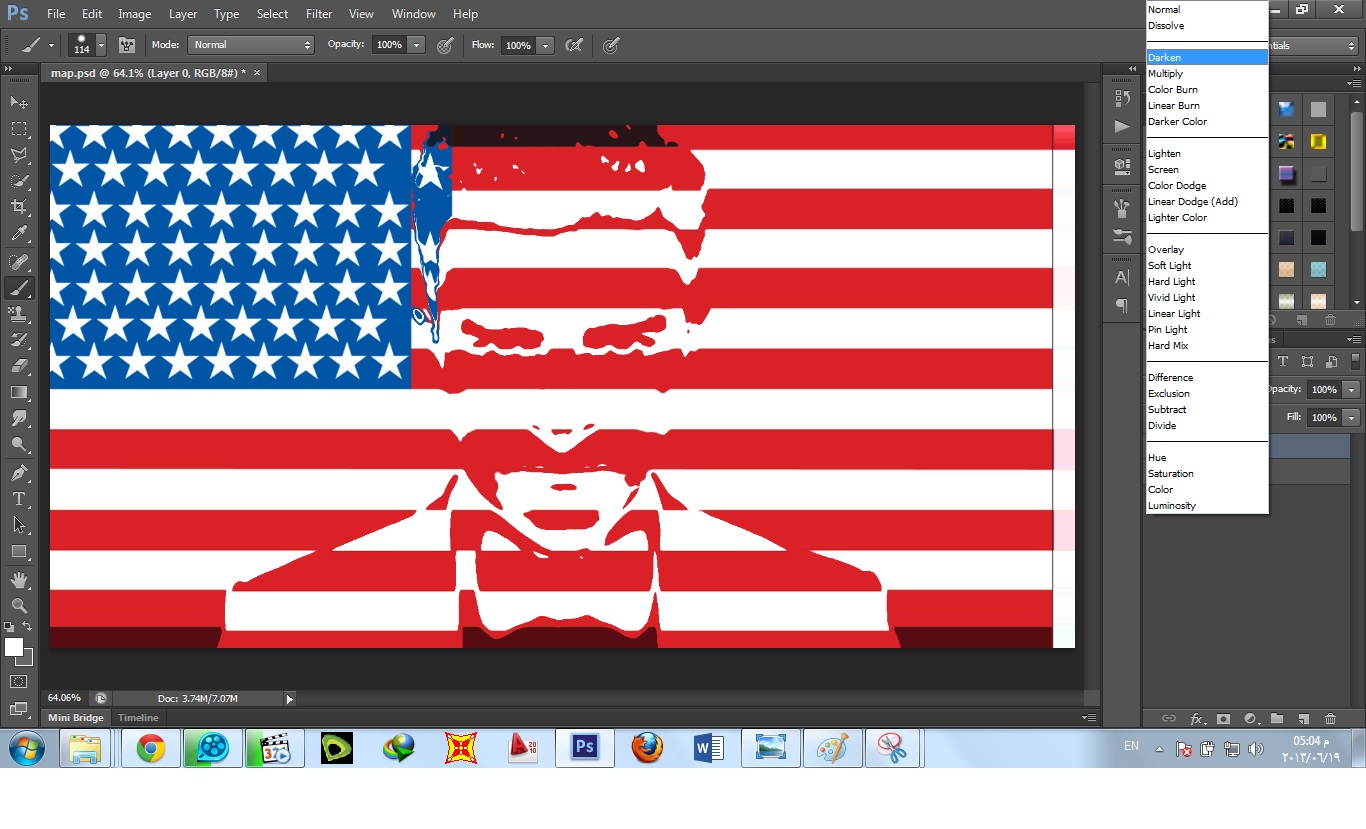
It will be like that

Changing its Modes is very helpfull here
It gives you lots of perfect results like that when I changed the Mode to
Color Burn
Or Linear Burn >> it will make it tense than Darken

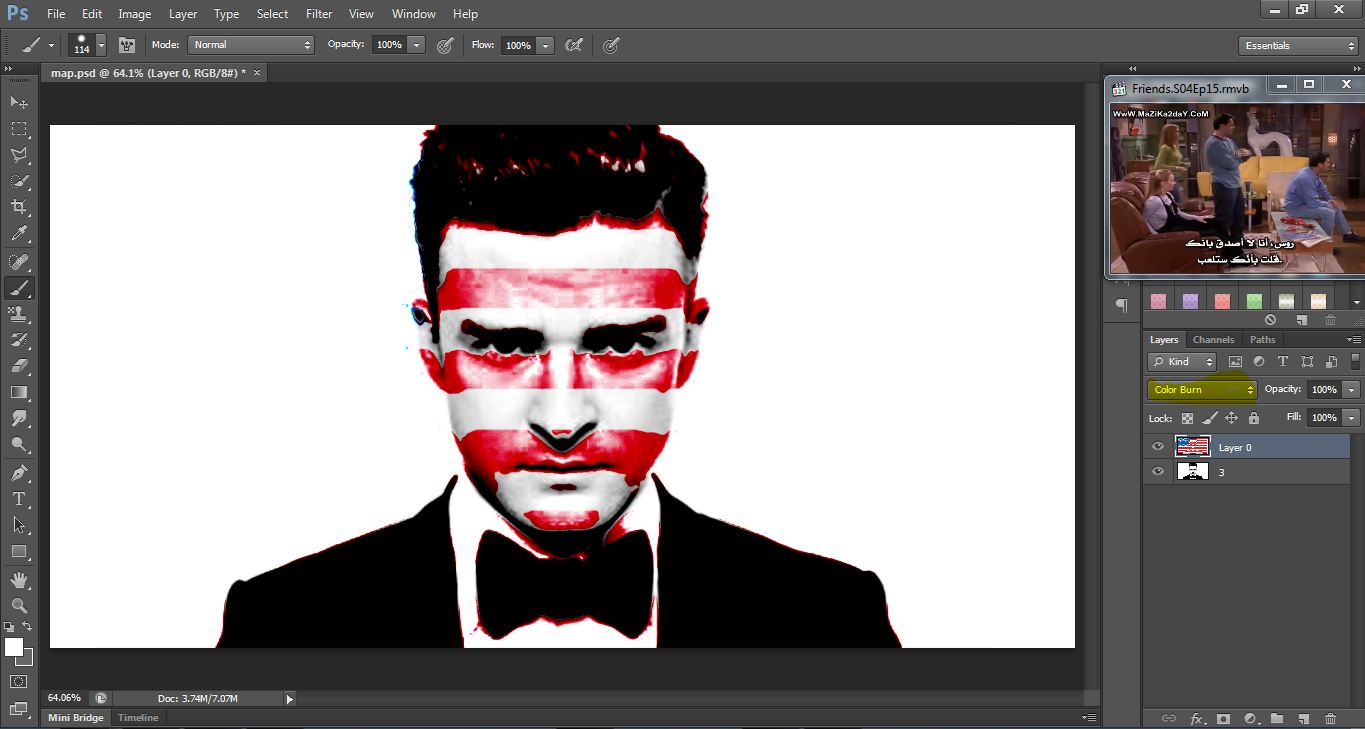
But we can benifit from all of these by adding Depth of Field
I will Show you
First duplicate the two layer the flag and the photo

After Hiding the new two images merge the old two layers
select the old two layers then >>>>Right Click >> Merge Layers .

Remember that the old flag layer is in Color Burn blend mode . ok!!
Now change the new flag layer mode to Linear Burn

then select the flag and the photo layer and merge them

Now we have two layer similar to each other
But the lower level was in Color Burn mode
And the other was in Linear Burn
but Not anymore Because we merged them .
Now Grab the eraser

then erase over the face in the upper layer which was in Linear Burn

To be that

And here Our Final Result
maybe you can add some effects as you like

Thank you
And remember to like and share


Hmmmm I am trying..... it's really nice trick. :)
ReplyDeleteRegards,
Edd.
Designer@ Background Removal Service/Clipping Path/Clipping Path Service/Neck Joint Service/Image Masking Service/Color Correction Service/Background Removing Service/Photo Retouching Services/Background Remover
Yes its really ver interesting tricks its working very well.
ReplyDeleteagree man
DeleteNice tutorial. This Photoshop trend is being used on different kinds of social medias like Facebook. I think Facebook has done a great job for creating an automatic apps to do the task in a second.
ReplyDeleteCool one! People can follow your blog to get some Photoshop techniques from you!
ReplyDeleteThanks for sharing, this is a fantastic post.Really thank you! Awesome
ReplyDeleteI really enjoyed your blog Thanks for sharing such an informative post.
ReplyDeleteI really like your take on the issue. I now have a clear idea on what this matter is all about.. clipping mask photoshop
ReplyDeleteI have little knowledge about it. You provide a full article abut this. It was helpful for me.
ReplyDeleteThank you.
Important tutorial. Thanks a lot!
ReplyDeleteperde modelleri
ReplyDeletesms onay
mobil ödeme bozdurma
nft nasıl alınır
ankara evden eve nakliyat
Trafik sigortası
dedektör
web sitesi kurma
Aşk Romanları
Good content. You write beautiful things.
ReplyDeletetaksi
mrbahis
vbet
hacklink
vbet
sportsbet
hacklink
sportsbet
korsan taksi
https://bayanlarsitesi.com/
ReplyDeleteTokat
Kastamonu
Tekirdağ
Gümüşhane
T512SO
Eskişehir
ReplyDeleteAdana
Sivas
Kayseri
Samsun
6FP
yalova
ReplyDeleteyozgat
elazığ
van
sakarya
EY6
ankara parça eşya taşıma
ReplyDeletetakipçi satın al
antalya rent a car
antalya rent a car
ankara parça eşya taşıma
6M3JQ
4F1D7
ReplyDeleteÇorum Evden Eve Nakliyat
Bolu Lojistik
Karaman Lojistik
Sakarya Parça Eşya Taşıma
Eskişehir Lojistik
038F4
ReplyDeleteGiresun Parça Eşya Taşıma
Tekirdağ Parça Eşya Taşıma
Tunceli Lojistik
Burdur Lojistik
Ağrı Evden Eve Nakliyat
1B852
ReplyDeleteSivas Evden Eve Nakliyat
parabolan for sale
Nevşehir Evden Eve Nakliyat
Silivri Fayans Ustası
Gümüşhane Evden Eve Nakliyat
Niğde Evden Eve Nakliyat
Mersin Evden Eve Nakliyat
order sustanon
Siirt Evden Eve Nakliyat
68B96
ReplyDeleteSilivri Çatı Ustası
Bartın Şehirler Arası Nakliyat
Zonguldak Lojistik
Burdur Şehir İçi Nakliyat
Sivas Evden Eve Nakliyat
Kilis Evden Eve Nakliyat
Isparta Şehirler Arası Nakliyat
Osmaniye Parça Eşya Taşıma
Karaman Şehirler Arası Nakliyat
72852
ReplyDeleteBibox Güvenilir mi
Batman Şehirler Arası Nakliyat
Bartın Parça Eşya Taşıma
Muş Lojistik
Referans Kimliği Nedir
Sinop Şehir İçi Nakliyat
Tokat Parça Eşya Taşıma
Artvin Parça Eşya Taşıma
Adana Evden Eve Nakliyat
D8E8F
ReplyDeletebuy sustanon
oxandrolone anavar for sale
sustanon for sale
deca durabolin
buy sarms
trenbolone enanthate
buy parabolan
buy testosterone enanthate
buy boldenone
F6273
ReplyDeleteMersin Evden Eve Nakliyat
Çerkezköy Evden Eve Nakliyat
Yozgat Evden Eve Nakliyat
buy steroids
sustanon for sale
Hakkari Evden Eve Nakliyat
Kripto Para Nedir
buy dianabol methandienone
Maraş Evden Eve Nakliyat
F64EC
ReplyDeletereferanskodunedir.com.tr
6AB0C
ReplyDeleteeskişehir canli sohbet bedava
kırklareli yabancı sohbet
sakarya görüntülü sohbet uygulamaları ücretsiz
afyon görüntülü sohbet siteleri ücretsiz
telefonda rastgele sohbet
konya yabancı sohbet
rastgele sohbet siteleri
bedava sohbet
sivas görüntülü sohbet sitesi
DRFBHGTRJ
ReplyDeleteشركة تسليك مجاري بالهفوف
شركة تركيب طارد الحمام بخميس مشيط ZoIeuudPZG
ReplyDeleteشركة مكافحة حشرات بالدمام 68lUM3o8JL
ReplyDeletePlease keep writing more on this topic—your insights are invaluable.
ReplyDeleteVisit Here: Ghost Mannequin Service
شركة مكافحة حشرات kfVILLyP9E
ReplyDeleteشركة عزل اسطح بالجبيل TOmxoCe5W1
ReplyDelete2816AACE24
ReplyDeletedüşmeyen takipçi
585D33E6DE
ReplyDeleteinstagram takipçi satın al
A321CF5AD6
ReplyDeleteinstagram takipci arttırma
81F64414B3
ReplyDeletedüşmeme garantili takipçi
twitter beğeni satın al
ig takipçi
garantili takipçi
aktif takipçi